

We all have a local thrift store in our town or at least the occasional yard sale down the road. Sure they can be hit or miss but today we have a project that just might have you stopping at every one you see. How about if we told you that the ultimate kayak cart could be yours for less than $30 and with about 30-45 minutes of work? Well there was a recent Facebook Group post from a kayaker who turned his old bicycle cart / trailer into a very impressive kayak cart. Of course it was not even a day to two after that when we found one at a local thrift store for $10. It felt like destiny and as advertised the conversion was just too simple. In fact the company could have just about sold it for a dual-use cart. Let's go over the process.
Before we go over what is involved in converting one of these bicycle trailers into a kayak trailer we should go over some secret features they have.
- The entire structure folds flat without any tools needed.
- There is a strong tubular frame under all that canvas capable of supporting even the heaviest of outfitted kayaks.
- The frame forms two flat-top arches that actually supports the hull of the kayak and keep it centered.
- The wheels pop off. In fact that is why this one was only $10, the wheels would not stop popping off. Turns out the locking mechanism was sticking...easy fix.
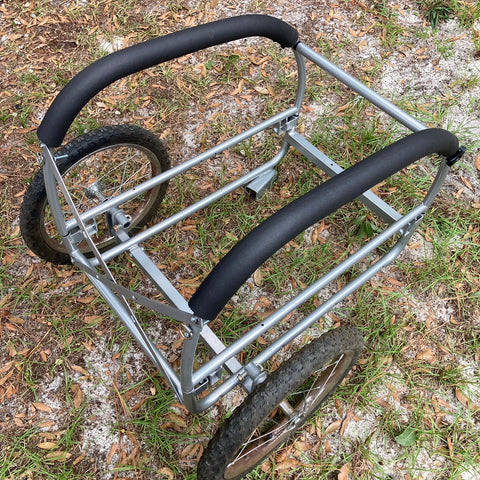
The process for converting one of these bicycle carts into a kayak cart is basically as simple as removing the canvas cover. Yep, that is really all there is to it. We did however go just a bit further and for another $10 we added some rubber pipe insulation from a local home center. These rubber tubes are slit down the center with an adhesive on both sides. You slip it over the metal tube and peel the protective layer off of the adhesive to seal the tube back together. So $10 for the cart and $10 for the tube and you are done. For another $10 we purchased a concrete mixing tub and sectioned it up to form a gear tray on the bottom. A little black spray paint to get the rusty wheels up to standards and we were "rolling" in under an hour.
Now our impression is a bit mixed on this project. I was inexpensive and it does serve the purpose. It is a little bulky but that is because we added some cross braces to the back for stability which cost us the folding feature. We really do not need that added support so they could go whenever we choose to remove them. In the end we would recommend this to paddlers who do not take the cart with them on the water. This is something you would want to throw into the back of the truck which means a few more trips back and forth but for $30 that is not bad.
Give it a try if you come across a cheap bike cart while out and about.
